# Effortless iPhone SIM Card Insertion: A Step-by-Step Guide
Bringing a new iPhone home is always exciting, and getting it set up with your cellular service is a crucial next step. For many, this involves the simple yet sometimes perplexing task of inserting a SIM card. Whether you’re upgrading to the latest model or setting up a new device, understanding the process ensures you’re connected in no time. This guide will walk you through each step, from locating the SIM tray to safely ejecting it, making the entire process straightforward and stress-free. We’ll cover the nuances of different iPhone models and provide helpful tips to avoid common pitfalls.
This guide is designed to be comprehensive, covering all essential aspects of SIM card insertion for your iPhone. We aim to demystify the process, ensuring a smooth transition to using your new device with your preferred mobile carrier.
## Understanding Your iPhone’s SIM Card Slot
The SIM card tray on an iPhone is a small, ingenious component designed for easy access and secure storage of your Subscriber Identity Module (SIM) card. This tiny card holds your mobile network identification, allowing your iPhone to connect to cellular services for calls, texts, and data. The location and appearance of the SIM tray can vary slightly depending on the iPhone model, but the fundamental mechanism remains consistent.
### Locating the SIM Card Tray
On most iPhone models, the SIM card tray is located on the **right edge** of the device. You’ll notice a tiny pinhole next to the tray. This is where you’ll insert a SIM ejector tool (or a small paperclip) to release the tray. For some older models, particularly the iPhone 4 and 4S, the SIM card tray is located on the **left edge** of the device, and it might be a pull-out tray rather than one with a pinhole. Newer iPhones, especially those sold in the US, may not have a physical SIM card tray at all, relying entirely on eSIM technology.
### Types of SIM Cards and eSIM
iPhones primarily use nano-SIM cards, which are the smallest physical SIM card size currently available. If you’re switching from an older phone with a larger SIM card, you may need to get a new nano-SIM from your carrier or, in some cases, carefully cut down your existing SIM card (though this is not recommended as it can damage the card).
Increasingly, iPhones support **eSIM**, which is a digital SIM embedded within the phone. This means you don’t need a physical card; you can activate cellular service by downloading a carrier profile directly to your iPhone. This offers convenience and flexibility, especially when traveling internationally or switching carriers.
## Step-by-Step SIM Card Insertion
Here’s a detailed breakdown of how to insert a SIM card into your iPhone:
### Step 1: Prepare Your SIM Card and Tools
Before you begin, ensure you have the correct size SIM card (nano-SIM for most iPhones) and a SIM ejector tool. If you don’t have a SIM ejector tool, a straightened paperclip or a small earring post can serve as a substitute. Make sure the SIM card is properly activated by your carrier.
### Step 2: Locate the SIM Tray
Turn your iPhone on its side and find the SIM tray. It’s usually on the right edge, marked by a small pinhole nearby.
### Step 3: Eject the SIM Tray
Insert the SIM ejector tool (or paperclip) into the pinhole. Apply gentle, firm pressure until the SIM tray pops out. Be careful not to force it. Once it’s slightly out, you can pull the tray the rest of the way out with your fingers.
Factoid: The nano-SIM card format, introduced in 2012, is 40% smaller than the previous micro-SIM standard, allowing for more internal space within smartphones for other components.
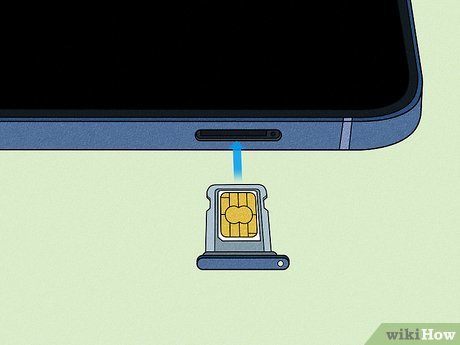
### Step 4: Place the SIM Card in the Tray
Examine the SIM tray and the SIM card. There’s a small notch on one corner of the SIM card that corresponds to a cutout on the SIM tray. Align the SIM card carefully so it sits flat and securely in the tray, matching the notch. It should only fit one way.
### Step 5: Insert the SIM Tray Back into the iPhone
Gently slide the SIM tray back into the iPhone. Ensure it’s oriented correctly to fit into the slot. Push it in until it’s flush with the side of the iPhone. You should feel a slight click as it secures.
### Step 6: Power On Your iPhone
Turn on your iPhone. If the SIM card is inserted correctly and is active, your iPhone should detect the carrier signal. You’ll see the carrier name and signal strength icons appear in the status bar at the top of the screen.
## Troubleshooting Common SIM Card Issues
If your iPhone doesn’t recognize the SIM card, or if you encounter other issues, here are some common troubleshooting steps:
* **Restart your iPhone:** A simple restart can often resolve temporary glitches.
* **Re-insert the SIM card:** Carefully remove the SIM tray and re-seat the SIM card, ensuring it’s correctly aligned and fully inserted.
* **Check for carrier settings updates:** Go to Settings > General > About. If an update is available, you’ll be prompted to install it.
* **Verify SIM card activation:** Ensure your SIM card has been activated by your mobile carrier and is compatible with your iPhone model.
* **Try a different SIM card:** If possible, test with another known working SIM card to rule out a faulty SIM card.
## Frequently Asked Questions (FAQ)
**Q1: Can I use any SIM card in my iPhone?**
A: iPhones require nano-SIM cards. While some older phones use micro-SIM or standard SIM cards, you may need to obtain a nano-SIM from your carrier or use an adapter if your current SIM is not a nano-SIM. For eSIM-compatible iPhones, you can activate service digitally without a physical card.
**Q2: Where is the SIM tray on an iPhone 14 (or newer)?**
A: iPhones 14 and newer models sold in the U.S. **do not have a physical SIM tray**. They exclusively use eSIM. For models sold outside the U.S., the SIM tray is typically on the left or right edge, accessible via a pinhole.
**Q3: What should I do if I lose my SIM ejector tool?**
A: A straightened paperclip, a small safety pin, or the post from a pair of earrings can be used as a substitute. Apply gentle pressure to avoid damaging the tray or the iPhone.
**Q4: How do I know if my SIM card is inserted correctly?**
A: Once inserted and your iPhone is powered on, you should see your carrier’s name and signal strength bars in the status bar at the top of the screen.
**Q5: Can I transfer my SIM card to a new iPhone?**
A: Yes, you can typically transfer your existing nano-SIM card to a new iPhone, provided it’s unlocked and the SIM card is compatible. For eSIM, you’ll need to follow your carrier’s instructions to transfer your eSIM profile to the new device.
### Key Takeaways for SIM Card Management
* **Always use the correct SIM size:** Nano-SIM is standard for most modern iPhones.
* **Handle with care:** Avoid bending or scratching your SIM card or the SIM tray.
* **eSIM offers convenience:** Consider eSIM for a physical-SIM-free experience.
* **Troubleshoot systematically:** Follow the steps outlined to resolve most recognition issues.
Factoid: The concept of a SIM card dates back to the early 1990s with the advent of GSM mobile technology, evolving significantly in size and functionality over the decades to meet the demands of increasingly sophisticated mobile devices.
**References:**
* Apple Support – Inserting the SIM card: [https://support.apple.com/en-us/HT201337](https://support.apple.com/en-us/HT201337)
Here is the data in a table format that can be easily inserted into WordPress:
| Category | Information